Every vegetable gardener will feed their plants to increase their yield. So what if you could make homemade liquid fertiliser for vegetables rather than buying it?
The good news is, it’s very easy and cheap to make your own liquid feed. And once you have the hang of it, you will never go back to buying commercial ones.
In this article, we will show you how to make your own liquid fertiliser for your vegetable plants using various materials and methods.
What Is A Liquid Fertiliser?
Let’s start with the basics. A liquid fertiliser is a concentrated liquid that contains essential nutrients for plants. The most common nutrients include:
- nitrogen, which helps plants grow lush foliage
- potassium, which helps plants grow fruit
- phosphorus
- iron
Because these nutrients are in many plants, it is possible to extract them to make homemade liquid feed for your plants.
And it’s very easy and cheap to do so!
5 Ways To Make Homemade Liquid Plant Food
The good news is, you can make liquid fertiliser out of most plants and other organic matter. This means you can use kitchen and garden waste to produce your own liquid feed.
In this article, we will show you how to make homemade liquid food for vegetable plants out of 10 different materials. You are sure to have at least one of them readily available.
And your fruit and vegetable garden will thank you for it, because organic feed that you make at home is so much better than commercial ones.
Materials
Before we go into the different organic fertilisers that you can make, let’s look at the list of materials you need to make homemade liquid fertiliser for vegetables.
- bucket
- some sort of lid
- bottle, such as old squash bottles
- water, ideally from a water bud
Depending on how much liquid feed you want to make, you need a bigger or smaller bucket.
You can buy them in different sizes, even with a lid, which makes it even easier. These cheap buckets with lids from Amazon will do the job nicely.

- 25 LITRE PLASTIC BUCKET WITH LID AND METAL HANDLE, HARD WEARING BUCKET
- SUITABLE FOR MANY USES INCLUDING:
- FERMENTING, AQUATICS, RUBBLE, FEEDING BUCKET, BAIT BUCKET, GARDENING, FLOWERS, SOILS, CHEMICALS
Of course, any old bucket will do, and as a lid you can just use a piece of wood and a brick, or anything else suitable.
1. Comfrey Fertiliser
Comfrey is also called green manure, and many vegetable gardeners have a comfrey patch. Because it makes great mulch, manure, and liquid fertiliser.
The roots of a comfrey plant go extremely deep into the ground, bringing up a lot of nutrients to the leaves. So their leaves are perfect for making plant food from.
It is also the best material to make a homemade fertiliser for vegetables, as it has the right balance of nutrients to mimic a commercial one.
Find out more about growing comfrey in this article.
The traditional method of making comfrey liquid feed is simple. Take your bucket and fill it half full of comfrey leaves. Then top it up with water and close the lid.
After 4 weeks, strain the liquid, and you have a homemade liquid fertiliser for vegetables. A word of warning: it will be very smelly, but your plants will love it.
To use it, just dilute it with water in a watering can. You want it to be the colour of weak tea.
Then use it to feed your plants. Don’t get it on the leaves, though. Water from underneath.
This is the simplest way to get a free supply of nutrients for your vegetables, that every organic gardener will love.
You can also use compression to get a more concentrated liquid food.
Cut a large handful of comfrey leaves (you can do several cuts of one plant in a season) and place them in a bucket. DO NOT add any water, but put a brick on top of them to weigh them down. Close the lid.
They will need to stay in this bucket for 10-14 days, until they begin to rot slightly.
After this time, add some water, enough to cover the leaves. The comfrey will need to be left covered in this water for 24 hours. The result is a brown liquid that hardly smells at all.
To use it, dilute it at a 10:1 ratio. One part homemade liquid food and 10 parts water.
And that’s how easy it is to make homemade liquid fertiliser from comfrey.
You can also use nettle leaves and process them the same way to give you liquid nettle fertiliser.
2. Seaweed Tea
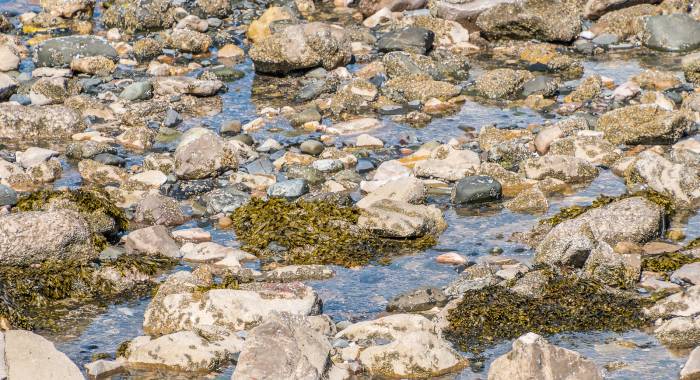
If you are lucky enough to live near the sea, you can make homemade liquid fertiliser for vegetables from seaweed.
Seaweed is full of nutrients that will help your plants thrive, including nitrogen, magnesium, potassium, and phosphate.
I use seaweed fertiliser to help seedlings recover from transplant shock.
The method is similar to that of making comfrey plant food.
Wash the seaweed well to get rid of any salt. Then put it in a bucket and cover it with water at a ratio of 5:1 (1 part seaweed and 5 parts water).
Cover and leave for 8-9 weeks. During this time, the seaweed will decompose and release the nutrients into the water.
Strain into a bottle, and you have seaweed liquid fertiliser. It will smell quite a bit, but it will do wonders for your plants.
To use it, dilute it at a ratio of 2:1, one part fertiliser and 2 parts water. Again, water from underneath to avoid it touching the foliage.
3. Banana Peel Fertiliser
Bananas, like all other organic matter, are full of vital nutrients, such as potassium, phosphorus, and calcium. So liquid plant food made of bananas or their peel will boost the growth of your plants a great deal.
If you grow roses in your garden, then this is the fertiliser for you, as they love it.
You can either use the banana peel or the whole banana to make a liquid feed.
Use the peel to make banana-peel tea. Put three banana skins into a bucket and add about 600ml of water. Cover and leave for 3-4 days.
The minerals will be released into the water, and you will have a nutritious banana peel tea for your plants.
Just pour it into the soil around your plants, and they will soak up all the goodness. And you don’t need to dilute it, either.
You can also use old bananas that you don’t want to eat anymore. Just put them in the blender with water. Blend until you have a smoothie-like consistency.
You can just pour it around the stems of your plants, and they will benefit from all the nutrients.
4. Compost Tea

If you have a compost heap, you can use your homemade compost to make ‘compost tea’.
You might ask why you should do this, as the nutrients will reach your plants anyway if you use the compost.
This is true, but a liquid feed will reach the roots quicker, which means they can absorb the nutrients more quickly.
It’s simple to make ‘compost tea’. Fill 1/3 of a bucket with homemade compost.
Then add water until the bucket is full. Put a lid on and leave for 1-2 weeks. Strain into bottles, and you have ‘compost tea’.
To use it, dilute it at a ratio of 10:1, with 1 part ‘compost tea’ and 10 parts water. Feed your plants as with any other liquid fertiliser.
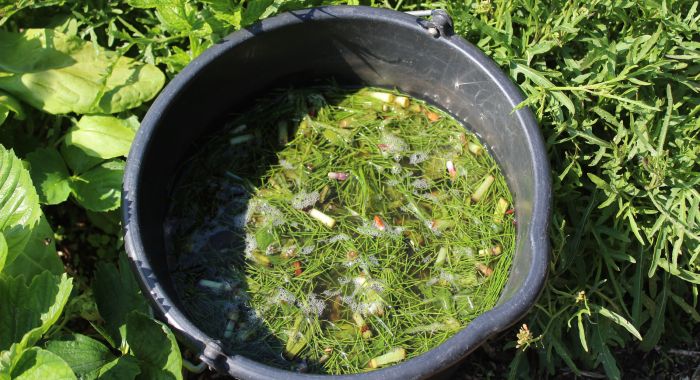
5. Weed Tea
Every gardener has an endless supply of weeds. And what better to do with them than making ‘weed tea’ to feed your veggies with?
While you can add annual weeds to your compost heap, as long as they have not set seed, and get use out of them that way, perennial weeds can’t go on the compost pile.
But you can use them to make a liquid fertiliser. Perennials with thick roots, such as dandelions, horsetail, bindweed, or dock, retain a lot of nutrients in their roots, and you can get these nutrients out by soaking the plant roots in water.
Put the roots and leaves of the perennial weeds in a bucket (half full at least). Then add water until the bucket is full, and cover with a lid.
Leave for 4-6 weeks to soak. This will get the nutrients out of the roots.
Strain the liquid into bottles. When you want to use it, dilute the weed liquid fertiliser until it has the colour of weak tea, and feed your plants with it.
6. Grass Liquid Fertiliser
Grass is rich in nitrogen and potassium, so grass clippings make a great homemade liquid fertiliser for vegetables.
And most gardeners have a lawn, so have grass clippings readily available. So next time you have cut your grass, don’t put your grass clippings in the garden waste bin or compost heap, but make a liquid plant food.
Fill a bucket 2/3 full of fresh grass clippings. Add water until the bucket is full, close the lid, and leave for 3-4 days.
Then strain the liquid and use it to feed your plants without diluting it.
Important Tip: Don’t use grass clippings if you have sprayed weedkiller recently, as this will kill your plants.
7. Manure Liquid Fertiliser

If you have access to cheap, well-rotted manure, you can use it to make ‘manure tea’.
Fill a bucket 2/3 full of manure and add water until the bucket is full. Cover with a lid and leave for about a week.
Strain the liquid into a bottle. When you use it, dilute it at a ratio of 5:1, with 1 part manure fertiliser and 5 parts water.
Use it to feed your plants by watering them from underneath.
Don’t throw away the used manure, though, put it on your compost heap.
8. Vegetable Scraps Liquid Fertiliser
You can also make a liquid feed for your veg plants from your kitchen scraps.
You can use vegetable peels, leaves, and even damaged fruits.
Fill a bucket half full of your kitchen waste, then add water until the bucket is full. Cover with a lid and leave, ideally in sunlight, for at least a week, but better two.
You want to stir the mixture every other day to speed up the decomposition process.
Strain into a bottle, and you have your own liquid plant food made from vegetable scraps.
To use it, dilute it at a ratio of 10:1, with one part fertiliser and 10 parts water and feed your plants like with other liquid feed.
9. Coffee Ground Liquid Fertiliser
If you are a coffee lover, then don’t throw away your coffee grounds. Because these can be used to make a ground coffee liquid fertiliser.
Coffee grounds are high in nitrogen, phosphorous, iron, calcium, and potassium, so great for your veggies.
Add 100g of used coffee grounds to a bucket that can hold 11 litres (2.5 gallons) and add water until it’s full.
Leave overnight to ‘brew’ then use to water your plants with it. There is no need to dilute it.
You can also use it as a foliar feed, which means you spray it on the leaves of your plants.
10. Worm Tea

A wormery also provides you with liquid fertiliser, which you can collect and dilute to feed your plants with.
The great thing about this is that you not only get homemade liquid fertiliser for vegetables in your garden, but also homemade compost.
To use this worm tea, dilute it at a ratio of 10:1, with 1 part fertiliser and 10 parts water.
If you don’t have a wormery but would like to make one, read our guide about how to make a wormery for garden compost.
Now that you know how to make homemade liquid fertiliser for vegetables, why not give it a go and make your own? Happy Growing!