Since 2010, we have been growing our own runner beans using a new and improved growing method. We originally saw this on the Allotment Garden forum and ever since we have been using this growing method as the results speak for themselves.
In this article you will learn how to grow runner beans as well as how to construct your own runner bean frame.
The New & Improved Runner Bean Growing Method
Preparing your growing area starts very early in the season, usually in January, we dig a trench about 1 foot deep and 2 feet wide. This trench is then filled with manure, compost and kitchen waste, which is then covered with an inch of soil.
This trench is then left untouched until mid-May or June when sowing begins.
Building Your Runner Bean Growing Frame
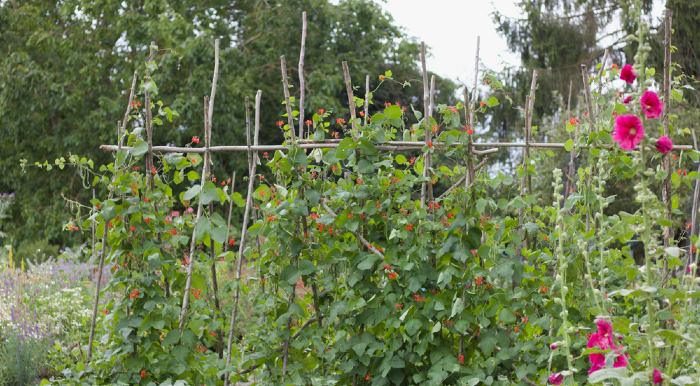
Let’s talk about a growing frame. This frame is designed to make it very easy to pick your beans. It also provides all the support needed for the huge number of leaves and beans that one plant can produce.
My frame was built using 2 inch square timber, although you can use any strong wood or metal posts. The idea is to make the frame point upwards, with the back posts being about 3ft tall and the front being 6ft tall. The individual bean supports can then be made with bamboo canes or strong string, 6 inches apart.
The smallest side of the frame should point north as the beans will always grow south towards the sun.
You can learn more about this growing method along with a huge discussion here.
Other More Traditional Growing Methods:
- Plant them in a tub, using a central pole with string radiating out for support
- Make a wigwam of six or seven poles planted in a circle and tied at the top
- Train the plants up netting, supported between strong posts
- Use a row of poles, connected by strong wire and supported at either end by stout stakes
You Might Need:

- BOSMERE Bosmere has a 50-year unrivalled heritage as brand leader in quality stitched products across outdoor cover and garden tidy ranges. Bosmere offer a comprehensive range of quality outdoor products designed to satisfy all requirements
- REUSABLE AND DURABLE Our reusable Runner Bean Bag is made from high quality polyethylene with drainage holes, wipe clean surface and U.V. stabilised for longer life
- SUITABLE FOR 10 PLANTS Will grow 10 runner bean plants per bag supplied with free easy to use Bean Ring (canes required)

- Complete Support System
- Easy to Assemble H: 1.8m L: 1.8m
- Polyethylene rope netting included

- 🌱【Size and Package Quantity】Total diameter: each 13.3cm/5.2"; Package Quantity: 6 pcs green wigwam cane grips (Note: our package does not contain bamboo poles).
- 🌱【12 Holes of Two Sizes 】Each canes supports is evenly distributed with 6 small holes (0.7cm/0.28") and 6 large holes (0.9cm/0.35"), can adapt different size of poles, and efficiently make use of your canes and their position to offer maximum support to your plants.
- 🌱【Sturdy and Reusable】garden cane grips are made of sturdy PE plastic, heat and cold resistant, not easy to break and age, reusable for next year.
3 Recommended Runner Bean Varieties
If you want to grow runner beans, you need to know about the various varieties and which ones to grow. So here are our recommendations.
Runner Bean Enorma – Enorma is a very good performer, even if it isn’t given the best conditions, it will still give a pretty good crop if the soil isn’t the best or if the weather is bad. This is a gardener’s favourite and is popular because it is extremely reliable. Often grown for the local show.
Runner Bean Scarlet Empire – Scarlet Empire is earlier than a lot of varieties, often growing to 11 feet tall. This variety is huge and grows incredibly fast. Expect huge, tasty crops from July onwards. Even when large, the beans are stringless.
Runner Bean Lady Di – Beans from this plant can grow 30 cm long. This variety is a heavy cropper and produces smooth, long and slender beans. They will remain stringless even when quite mature.
Planting Runner Beans & Important Aftercare
To grow runner beans successfully, it’s important to wait until the danger of frost has passed before sowing. When planting, it’s wise to sow a few extra seeds to fill in any gaps that occur, as it’s quite common to lose a few plants from frost or the slugs. Aim for five or six plants per person, or double this amount if you’re hoping to freeze some too.
You can also start your plants off in pots (we would recommend roottrainers) indoors, as this will give them the very best start with no danger of frost. Be careful not to disturb the roots when you transplant them outside.
If you want to avoid transplant shock or damaging the roots when you transplant your bean seedlings from their germination pots outdoors, then we would recommend you use soil blocks.
Soil blocks are an alternative to plastic pots that consist of compressed compost. Once your seedlings are ready to be replanted, you just stick the whole soil block in the ground, thus avoiding any transplant shock or damage to the roots.
The result will be stronger and healthier plants. Read our article about soil blocks to find out more about their huge benefits.
Plant out 6 inches apart in rows 2 feet apart.
Remember to weed around the young plants over the next few weeks, making sure that you don’t damage them. As the plants start to wind up their support, tie them loosely but securely to their own poles, canes, or string.

If you don’t do this, they can sometimes get very tangled up and difficult to control! When they reach the top of the canes, pinch out the tops. This encourages lateral growth and helps to increase the amount of beans you’ll get.
Be careful not to give your plants too much water when they’re still growing, as you’ll encourage leaf growth at the expense of flower and bean growth. If possible, add a mulch (a layer of grass clippings or bark fibre) to well-watered soil around the base of the plants.
This slows the rate at which the water evaporates from the soil and helps smother weeds, too.
Make sure you give your plants enough moisture when in flower, though, otherwise the flowers will drop off and the pods won’t develop. Too little water is actually harmful as it encourages the roots to come to the surface where they will dry out quickly. You can also feed every 7-10 days at this period if your plants are beginning to look tired.
Harvesting Your First Runner Beans
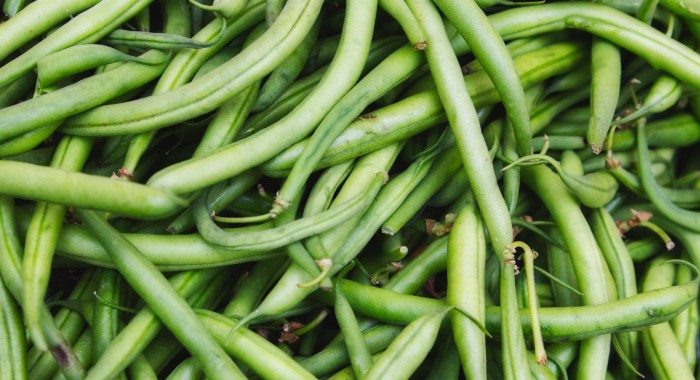
The best thing when you grow runner beans is harvesting them. If you don’t want stringy beans (and who does?), pick your beans when they’re still small: that is, before the beans themselves make the pods look knobbly.
The golden rule is to keep picking them, making sure you harvest your crop every couple of days. If you leave them for longer, you will find that some of the pods grow to full size. Once a pod has reached “maturity”, the bean plants will stop producing more beans.
Although crop rotation is recommended, many very successful gardeners admit to growing beans in the same soil for 20+ years by simply adding manure and compost at the start of each season. This might be worth considering if you are building a bean frame. Otherwise, don’t forget to take down, clean and store your frame, poles and nets, ready for next season.
Follow these instructions and you should have a great crop of beans until the first frosts start in Autumn.
GROWING TIP: At the end of the season, dig in the roots of your runner beans, they are a valuable source of nitrogen which will improve the soil for next year!
Common diseases and pests
No guide about how to grow runner beans would be complete without a section about diseases and pests.
Runner beans are commonly known to be very easy to grow, that’s why so many people grow runner beans. But they are still affected by common diseases such as blight or runner and French bean rust and can be host for pests such as aphids, slugs and snails.
They do also need good care to avoid common problems such as brown/grey marks on the leaves.
Common diseases that affect runner beans
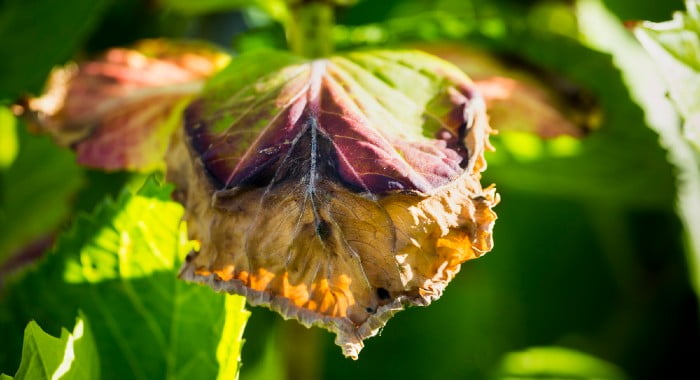
Like many other vegetables, runner beans are also prone to halo blight (or early blight), which is a common bacterial disease. So, in order to grow runner beans successfully, you need to know about this disease.
How do you spot halo blight on your runner beans? The first signs will be very young leaves that turn brown. Some might fall off, others will survive, but will be left scarred by brown spots with a yellow edge, like a halo. You might also see brown spots on the stems of your bean plants.
As this is a bacterial disease, it is already in the plant, most likely in the seeds. Seeds that are past their sow by date could have these bacteria in them, so make sure you don’t use any seeds after their sow by date.
You might also have bought an infected batch of seeds. But don’t worry, as the disease affects young plants, you can just remove the plants from the soil and sow new ones, ideally from a newly bought packet to avoid sowing more infected seeds. Halo blight does not stay in the soil like late blight does, so it won’t affect the location of next year’s plants.
So if you spot any signs of halo blight, remove the affected plant and re-sow.
Another common disease that affects runner beans is runner and French bean rust, a fungal disease that affects the leaves. Like most fungal diseases, it’s most prolific in wet weather. A bad infection can have an impact on your plant’s health and yield.
You can spot if your runner bean plants have bean rust, if you notice white spots on your leaves, which might be raised on the upper side of the leaves. As the infection progresses, brown and then black spots will appear. If it’s a bad infection, the leaves will turn brown and die and affect the growth of your plants.
Bad infections tend to happen too late in the season to negatively impact on your yield. However, prolonged warm and wet weather conditions during the summer can increase the risk of bean rust developing.
If you spot signs of bean rust on your runner bean plants, follow the following steps to minimise the impact:
- Remove any leaves that have spots as soon as you see them to halt the disease from progressing. You are likely to see the first spots on older leaves.
- If any of your plants is heavily infected, dispose of them immediately to avoid the spores from spreading. Black pustules contain spores, which can overwinter.
- After cropping has finished, remove all bits of the plants, especially fallen leaves, and dispose of them.
- If you save seeds from your beans to plant next year, make sure you don’t use any seeds from an infected plant as they can survive in the seeds.
To minimise the risk of bean rust developing on your plants, thin out your plants to minimise humidity, which will help to prevent infection.
Runner beans are sensitive to harsh weather conditions. When you plant your runner beans out, make sure you choose a location that is sheltered and protects your plants from wind. If runner beans are left in the open, they can suffer from wind burn, which manifests itself in brown or grey marks on the leaves.
Light damage will not cause any problems, and the plants will recover. If you want to give your plants a helping hand, then you can give them a liquid fertiliser, such as Envii Seafeed Xtra. It should take about two weeks for the plant to recover.

- Boosts Plant Growth & Crop Yields - Natural Seaweed fertiliser that enhances strong & healthy plant growth, promotes lush foliage, and increases crop yields for thriving plants.
- Nutrient Rich Plant Food - Enriched with iron and plant-based amino acids to nourish garden plants, improve soil health, and support plant & root development.
- Versatile & All Purpose - Ideal for lawns, fruits, vegetables, flowers, trees, and all other garden plants. Perfect for any outdoor or indoor plants.
Make sure you water your runner beans regularly, as dryness prevents the pods from setting.
Common pests attacking runner beans
Like with many vegetable plants, aphids are one of the most common pests to affect runner beans. So if you want to grow runner beans, you need to know how to deal with aphids.
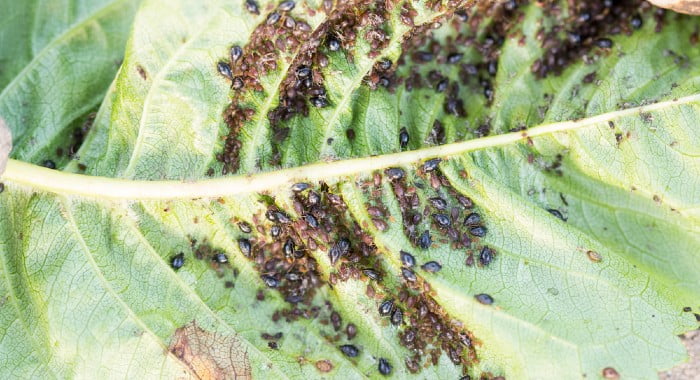
Runner beans are affected by the black bean aphid or blackfly. These are small black insects (sometimes with white specs) that suck the sap from leaves and stems.
They form colonies, and you will spot them first on the underside of young leaves. If left unchecked, the colony will grow, and they will move to older leaves, stems, and pods. You might see ants on the same plants as the aphids. This is because they like honeydew the aphids excrete and ‘farm’ them. They will protect them from predators.
A heavy aphid infestation can hamper the plant’s growth and reduce your yield.
While a small aphid colony will not impact on your bean plants or crop size, if it becomes a heavy infestation, it’s time to act. Take the following steps:
- Remove as many aphids as you can with your fingers, squashing them as you go along.
- You can also shake affected plants carefully so that the aphids drop off. Catch them on paper and remove them to a part of your garden where they cannot do any damage.
- Wash affected plants with soapy water. Mix a couple of drops of washing up liquid with a litre of water and pour in a spray bottle. Then spray your plants. Repeat for four to five days. You can also buy commercial insecticidal soap. I have used Horticultural Gentle Liquid Soap with Organic Neem Oil, which got rid of the aphids brilliantly. Try to stay away from chemical pesticides as they can harm other wildlife such as bees and the natural predators of aphids.

- Pure organic cold pressed neem oil concentrate unrefined one 1000ml bottle
- Gentle biodegradable liquid soap derived from plant oils one 1000ml bottle
- Combine together with water to form a neem spray or drench
Slugs and snails love young runner beans and can wipe out your crop in one night, if given half a chance. Thankfully, they only like the really young plants and, as runner beans are quick growers, this means you only have to protect them for the first three to four weeks.
Here are some steps you can take to keep these greedy slugs and snails away from your young runner bean seedlings:
- Start off your runner beans indoors and only plant out when they are too old for the slugs and snails.
- If you want to plant your seeds directly outdoors, encircle the seedlings, as soon as they appear, with dry fine compost. The slugs and snails don’t like crawling on it because it blocks their crawling mechanism. After rain, just add a new layer of dry compost.
You can also use old plastic bottles to make your own DIY slug and snail protection. Wash the bottle, then remove the bottom of the bottle. Cut the bottle in half and place each half over one of your young plants. In warm weather, remove the top part of the bottle, as it will act like a greenhouse and trap the heat. This could kill your seedling.
You can buy slug pellets, but these will kill the slugs and snails and there is no need for this as you can protect your runner beans easily from them.
Also, slugs and snails are very important for our ecosystem.
You might also find green shield bugs on your runner beans, a sap-sucking insect. You can spot them easily, they have a distinct shield-like shape, with a brown mark on its bottom. It’s a native insect species and they don’t tend to do harm to your plants.
There is a new species that has colonised the south of Britain and was named the southern green shield bug. It’s completely green with no brown bottom. At the moment, it’s only found in the south and east of England. This new species can cause damage to some vegetable plants, such as runner beans.
However, it doesn’t appear to become numerous enough to do damage until late summer or early autumn, by which time the cropping period is in its last stages, so no real damage is caused.
But with our climate changing, they could become a problem in the future, so it is good to be aware of it if you grow runner beans.
Now that you know all you need to grow runner beans successfully, you can look forward to delicious homegrown beans all summer! Still more questions? Head to our FAQ page about growing runner beans.


